How to create an inviting play space with a small budget.
*Deep breath* it’s time to tackle the playroom.

Junk room, catch-all room, a bit of everything room. Whatever you want to call it, it is a disaster. Half office, half playroom, it is the first room you see as you come in the front door. And because it doesn’t have a door it always drives me insane.
It’s not unusual for Steve to find me muttering to myself about how this room must have bad feng shui or juju. Whatever I do to it never seems right. After one last late-night cleaning session I had had enough. It was time to give this room some attention and love, and turn it into a space we wanted to be in.
There was a catch though – this was one month after Christmas and our budget was not set up to include purchases of any kind.
Time to pivot and set a challenge.
Playroom On A Zero Dollar Budget
For this room, my goal was to spend $0. Zip. Zilch. Nada. I allowed myself to use anything I could find in the house that wasn’t being used to its full potential and could upgrade it with paint (if we had the right colors already).
My goal for the playroom: To use our existing furniture and toys to create a calm playspace for our three kids (ages 6, 3 and 1). I created a mood board to help identify what I wanted from the room. Here it is:

The rules: no spending money and one week to complete it. Let’s see how I went!
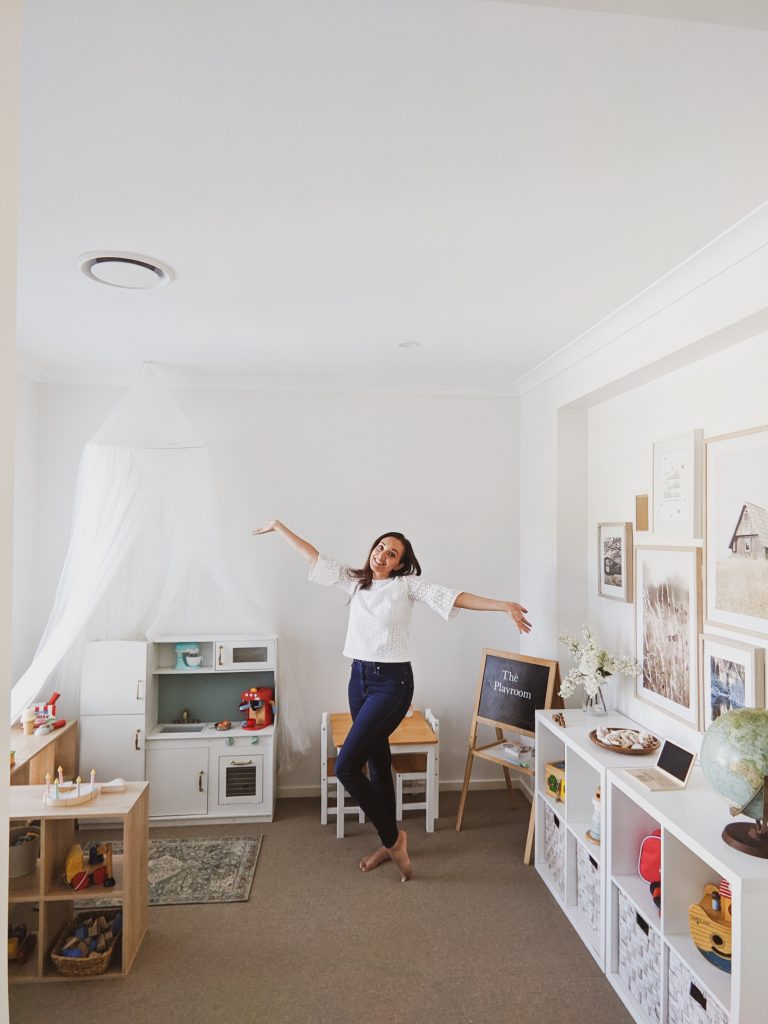
The first thing I did was move in some cube units that were barely being used in the kids’ wardrobes. I knew I wanted every toy in this room to have a home and this was the easiest way to add storage. The white units are Bunnings Flexi Storage and the white baskets are from there too. The Wood Look Units are from Kmart Australia. I also pulled in the play kitchen which is a few years old, also from Kmart Australia. A coat of paint and it was like brand new.


Above the kitchen I hung a white canopy my daughter no longer wanted from the roof. I like the way it sections off the kitchen and makes it feel special. Adding an indoor mat from Bunnings made the perfect home corner rug.

The large prints on the wall are from Target Australia, and sadly no longer sold. The rest of the art was from coffee table books, mostly Lonely Planet. I didn’t have any matching frames so I used some wood-look contact to transform some old black frames.
And now for the part where I tell you that I failed.
I bought one thing.
I was browsing in an antique shop when I saw the globe sitting on a dusty shelf. I knew I had to have it, and while I could have put it in another room, I love the way it adds a bit of school room charm. So I’m a failure. But I’m ok with that. It looks fabulous and I still think I did a great job pulling the room together.

Before I go, I wanted to add a few quick tips for creating play spaces that work:
- Make sure every toy has a home and leave some space for future toys/creations to live.
- Divide the room as best you can into zones. That way kids playing separate games won’t be in each others way.
- Make toys accessible, easy to see, and easy to reach.
- Keep it as calm and organised as possible! Keep it inviting and overwhelming.
- Too many toys? Think about doing a toy rotation by boxing some up to swap out in a few months time. It’ll be like Christmas!
Did I forgot anything? Let me know in the comments below
Sarah xx

Leave a Reply